By Cameron Ware
3′ Benchmark – Locate your elevations from here. Don’t assume the slab is perfectly flat.
Someone smart once said, “Experience is what you get when you don’t get what you want.” When I first heard this years ago, it didn’t really make much sense to me.
Basically, we learn from the mistakes of others, but we gain experience from our own mistakes.
When I thought of a tip that would benefit a new installer, I immediately thought of control lines and benchmarks that “should” be part of the layout process for ICF installation. I am using the word “should” because some installers, even a few experienced ones, don’t bother.
Control Lines
To ensure a successful ICF installation on a slab-on-grade home, it is important to establish whether the slab dimensions are correct before popping lines and placing walls. Some less-experienced installers may assume the slab will determine wall placement, but this could lead to errors if the slab dimensions are incorrect. To avoid this, control lines should be placed on the slab and each wall location should be measured to ensure the slab is square and correct. This approach can prevent potential issues and mistakes.
For our example, let’s assume you are starting a simple rectangular ICF installation on a slab-on-grade home. You arrive at the job and find a slab to work with. Less-experienced installers might assume that the slab will determine where the walls go, and they will pop a line offset by the wall thickness. This is usually okay — provided the slab dimensions are correct. But before starting the project, we want to use control lines to establish whether the slab is correct or not.
This is easily accomplished with the placement of control lines on the slab and then measuring each wall location to make sure the slab is square and correct. Assuming otherwise will make you part of the problem should there be an error in the slab. I have even seen experienced installers make this mistake. If you subscribe to this approach, you can avoid this potential pitfall.
Primary Control Line – Parallel to Slab.
Second Control Line – Perpendicular to Primary.
First, pop a line parallel to one of your main walls. In this example, it is 3 feet from the edge of the slab. Pop a second control line perpendicular to the first so that you can measure the future location of each wall. Use the 3-4-5 method to ensure your second line is perpendicular to your first line. Measure all future wall locations from these control lines to be sure the slab is correct.
If you are installing a 6-inch core wall, you might be tempted to take a shortcut and just measure over 11 1/4 inches from the slab edge and pop a line. This might get you in trouble. You must first check the slab to be sure you are putting each wall where it belongs according to the drawings — NOT according to what is implied by the slab. If the slab substrate is wrong or out of square, walls that are supposed to be parallel or perpendicular will not be. You need to present this information to the builder and see what he wants to do. Usually, all that is necessary is minor tweaks to make the walls parallel or perpendicular.
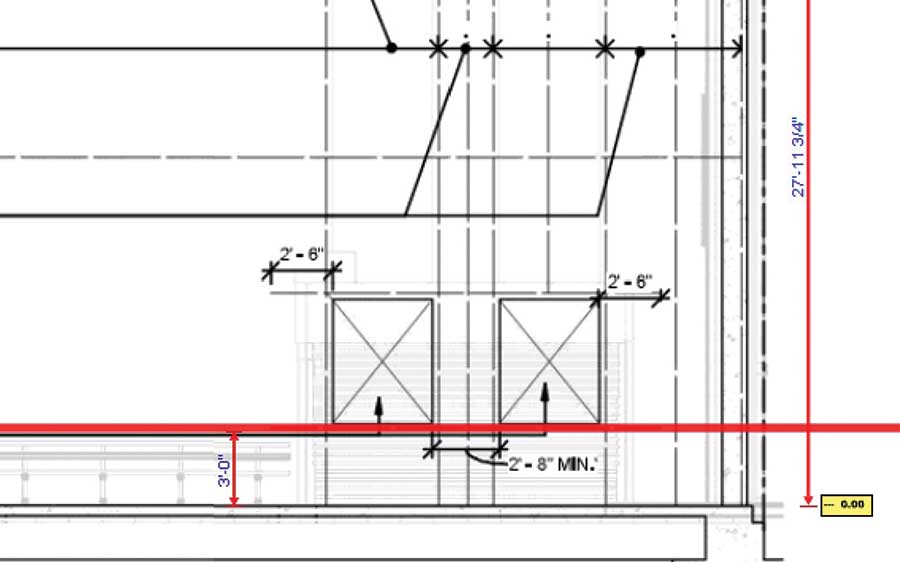
Benchmarks
Benchmarks are much easier to explain than control lines. They are used to make sure your elevations are correct. For example, after your walls are up a few feet, and before bracing, make sure they are plumb and run a rotary laser or transit inside the building and (for this example) mark a 3-foot horizontal line on the wall. This line will provide a starting point to measure to locate window elevations, wall elevations, and embeds.
Why bother with control lines and benchmarks? Whether wood or steel, you want the roof framing package to work and if you don’t check this you might find yourself learning the hard way. You can’t go wrong by using control lines and benchmarks, but you can go wrong without them.

Cameron Ware
Cameron Ware is the Western Division Key Accounts Executive for Tremco CPG Inc. Cameron’s responsibilities include sales and technical support for Nudura Insulated Concrete Form Products in the Western U.S. He began working with ICF in 2004 when he founded FutureStone, a Nudura distributor. To date, Cameron has supported the construction of several million square feet of ICF, including providing product and technical support to more than 200 ICF school projects including 250 mile-per-hour rated ICC-500 Storm Shelters.


