Unless your job is a one-story, slab-on-grade project, it will involve setting floor joists. There are probably half a dozen ways to attach joists to the ICF walls, and each has its own advantages and drawbacks.
In general, methods can be grouped into three broad categories:
- Use a wooden ledger, and then attach the joists as you would with frame construction.
- Use a steel joist hanger that anchors directly to the concrete core of the wall.
- Build a ledge on the inside of the building to set the joist on.
Ledgers
The most common method involves attaching a wooden ledger board—usually a 2×10 or 2×12—to the wall and then using steel joist hangers. 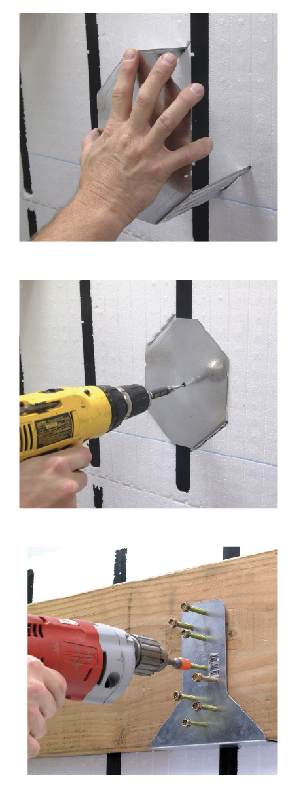
“One advantage of the ledger system is you have a continuous surface along the walls to support the subfloor,” says Tom McClain, core products manager at Simpson Strong Tie.
Matt Shackelford, writing in the ICF Answer Book, says there are cost advantages too. “I personally like the ledger,” he writes. “Your framer will also be used to working with a ledger, and anytime you can provide something the framers are familiar with, they seem to be happier and won’t try charging more.”
The ledger, of course, must be securely anchored to the concrete core of the wall, which is where many of the questions—and problems—arise.
Anchor Bolts: In the early years of the industry, builders used anchor bolts, which had to be carefully set in place and reinforced prior to the pour. Some builders still use this method. The challenge is that the holes in the ledger have to precisely match the location of the anchor bolts in the wall. This is especially problematic if form compression occurred during the pour.
It is possible to pre-set the ledger by screwing it to the furring strips before the pour, with the anchor bolts already attached. Additional vertical bracing made from 2x4s is used as needed. Once the concrete is poured and cured, your ledger is ready to use. Pre-setting the ledger, however, can interfere with the wall bracing. And it makes no allowance for form compression, either.
“If the ledger doesn’t turn out level after the concrete is placed, then reworking the ledger for level negates any benefit of presetting it in the first place.” writes Ian Giesler of ICF Builders Network. “Presetting the ledger is a timesaver for the experienced contractor, but the ‘screw-up factor’ is lurking here.”
He says that while anchor bolts are “the only option when multiple bolts at specific intervals are specified… the overall time requirement for this method would rank as one of the slowest and most costly.”
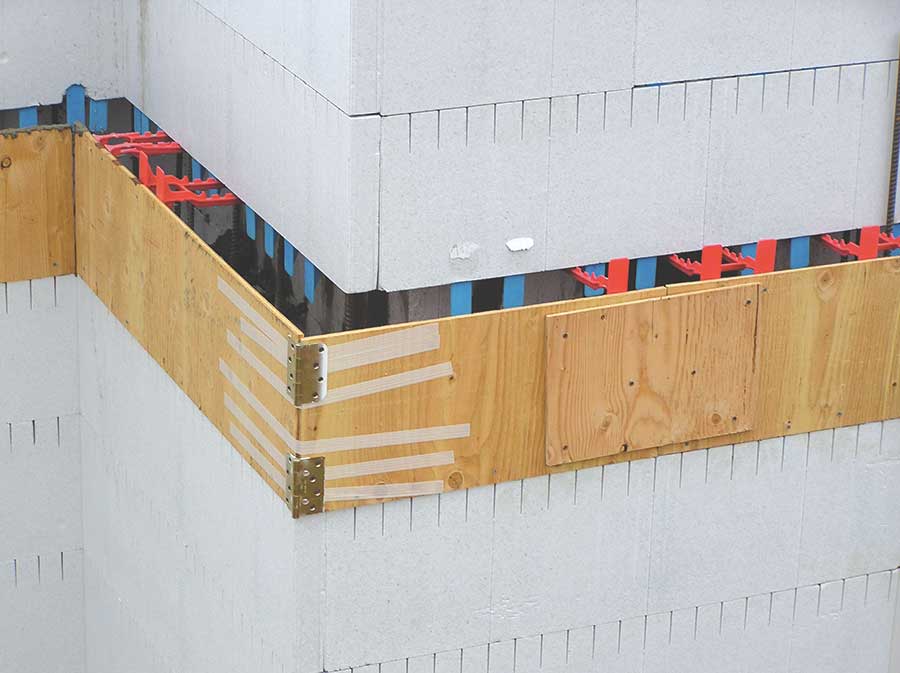
The ICFVL: Simpson Strong-Tie has a product that virtually eliminates all of those headaches. “Our system offers significant labor savings over other methods,” confirms McClain. “Just snap a line at the height of the bottom of the ledger and mark the on-center spacings,” he says. “Then you cut the kerfs in the foam and insert the ICFVL.” After the concrete has cured, the ledger is attached using a Simpson ledger connector and eight 3’ screws.
“This system can deal with form compression easily,” McClain says. “It has ¾ of an inch of adjustability. In the past, with anchor bolts, you had to hog out the foam, center the anchor bolt in the hole, brace it with plywood, and hope nothing shifted during the pour. If it did, contractors would usually have to drill additional holes in the ledger, which may weaken it significantly. The ICFVL is much simpler and stronger.”
Geisler agrees. He writes, “For time, cost, simplicity, and ease of use, this method is hard to beat.”
ICF Joist Hangers
Keith Hern, a residential and commercial ICF contractor in Golden, British Columbia, says it’s easiest to skip the ledger and go straight to joist hangers.
Specialized ICF joist hangers are rapidly gaining popularity. These anchor the joists directly to the concrete core of the wall without needing a ledger or brickledge. Builders who have used them say they are simple to use and easy to install.
ICF Connector: Hern uses the anchor/hanger system from ICF Connect, Ltd. “It worked really well,” he says.
The ICF Connect system consists of two stamped flat sheet plates, which are inserted through the foam wall on each side of the joist locations. Once the concrete is placed and cured, the joist ends are wrapped with a “bearing bracket” and secured to the plates with six #10 screws per joist.
As long as the plates are placed at 90° to the foam face, ICF Connectors have a fairly high margin of error—up to two inches vertically. The company offers 45° plates for joists hung on offset walls, and also sells retrofit brackets that can be used to correct major mistakes.
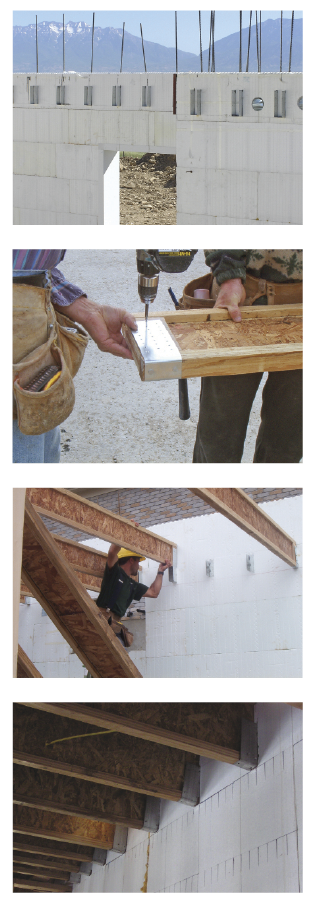
Hern says joists can be installed quickly and easily with this trick: “We just snap a line, put a 1×4 on the line and screw it to the furring strips,” he says. “That way, we don’t have to hold the joists, and don’t have to worry about them slipping while we screw them into place.”
Watkins Hanger: RP Watkins markets another type of hanger. The U-shaped piece of 16-gauge steel is 7 inches long, and is simply pushed into place through the foam, leaving the final 2 ½ or 3 inches exposed to set the joist on.
Reinforcing steel is then slid into the bracket inside the wall, using the pre-punched holes, which locks the hanger firmly into position. Because the hanger has steel supporting the bottom of the joist and is integrally connected to the rebar in the concrete core, it the strongest joist hanging method described so far, with a load rating in excess of 2,500 lbs.
Bob Watkins, owner of the company, recommends fastening a 2×4 below the hangers before the wall is poured to eliminate surprises. If, through sloppy installation or form compression, the hangers have shifted, you’ll have to adjust by shimming or trimming the joist.
Both the Watkins Hanger and the ICF Connector are less labor intensive than they first appear. While they do require cutting through the foam at each end of every joist, those areas do not require additional reinforcement, like anchor bolts would. They also eliminate the step of going back after the fact to install joist hangers off the ledger. And unlike ledge systems, they don’t require block-outs between the joists.
With either of the above methods, it’s important to establish the floor joist layout prior to installing the wall bracing system so they don’t interfere with each other. Make note of the tie positions, as they can cause problems as well.
Brickledges
The strongest way to install floor joists is to create a concrete ledge on the inside face of the wall. This is probably the best option for extremely heavy floors, such as pre-cast planks, or second-story garages. To create a ledge, you can use special brickledge blocks, which most major manufacturers offer in common widths; or use regular block and just scale back to a smaller core size at the joist location.
Either method is relatively cheap, both in materials and labor, and fairly foolproof. But they do have drawbacks.
Brickledge: If you use a brickledge block, it can be tricky to ensure that the height of the ledge will precisely match the joist elevation shown in the plans. It can also create problems in the room below. Unless you have a dropped ceiling, the walls in that room will angle sharply near the ceiling, making life difficult for the drywallers and other subs.
Taper-Top: You can create a joist ledge with regular block by simply stepping back to a smaller concrete core. It’s easier to get the ledge at the right height this way, and it eliminates the “ceiling bulge” that brickledges create.
The ledge created using regular block isn’t as wide—usually 2” instead of 3 ½”—and unless you can order factory-made taper-top blocks, you’ll have to handcut your own, which can be time intensive.
It will also require significantly more concrete. Using an 8” core instead of a 6”, for instance, will increase concrete costs by 25%. That’s an additional 10 yards for a 2,000 sq. ft. basement.
With either ledge method, you’ll need to install pressure-treated sill plates to keep the joists off the concrete, and fasten “block-outs” or bracing between the ends of the joists. Your structural engineer can determine whether you’ll need the ledge on all four walls, or just on the two opposing ones.
Ledgers, brickledges, and ICF joist hangers all have advantages and drawbacks. They system you choose will probably be based on personal preference, previous experience, and floor layout. Whatever method you use, be sure that everything is set, level, and plumb before the concrete is placed. Like everything else in ICF construction, after the wall is poured, corrections become much more costly and difficult.


I’d like to know how many and size of bolts if ledger is bolted to wall after formed
i am in a situation here Ihad icf forms put in for an addition contractor did not install the icdvl 14 gauge connectors or any other connectors before the pour of the concrete for me to attach the leadger board to do I need to now drill for anchor wedges cut out foam and put wood blocks behind for support so my wedge anchors are solid and what would be my spacing for the wedges on my 2×12 leadger being installed