By Dan McCullough
Photos courtesy of Dan McCullough
Using pencil rod bracing is a method to reinforce or restore the ability of ICF forms to handle the pressure exerted on the forms. In certain situations, when the integrity of the ICF forms has been compromised, pencil rods may be a good method of bracing. Pencil rod bracing has been in use for years in conventional concrete forming as a method to brace wooden forms where tension is needed. I have always referred to these clamps as “cat-head clamps,” but that doesn’t seem to be the standard name for them, and I have no idea where I got that name from! For the purposes of this article, I will use the term pencil rod clamp, and hopefully explain how useful they can be as an additional method of bracing ICFs in difficult situations.

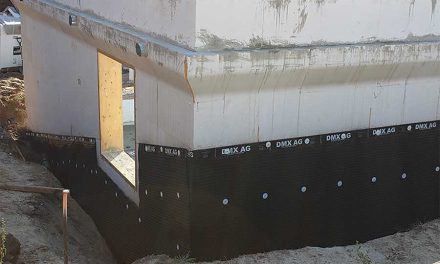
The ICF form system could be compromised for a few reasons, including any time the tie has been cut or broken. It could also be because of various wall layout designs, for example, offsets in a wall placing two left and right corners resulting in a reduced offset of the blocks interlock. It could also happen when a door or window is placed next to a corner.
Most ICF forms typically prefer at least a minimum of 8 inches and up to 16 inches of overlap for vertical seams to ensure that the ICF wall system retains its original strength or capacity. This is preferred to be able to keep the shape of the forms when filled with concrete. There are several different methods to accomplish this, and I have used pencil rod clamps for years with great success. This method provides internal tension through the use of small-diameter steel rods.
One of my favorite uses is to remove the internal braces usually installed in doors before being poured. I really dislike having to crawl through the cross members of braced doors. By using a pencil rod to contain the pressure on each side of the door jam, the cross braces can be removed, allowing a free passage through doors.
Pencil Rod
When ordering, I usually ask for #2 smooth rods or sometimes 1/4-inch pencil rod. It usually comes in 20-foot lengths and is found at most locations where rebar is sold, especially with suppliers who offer cutting and bending services. For best results, try to get your rod in clean and straight pieces. If a pencil rod is bent, it can be difficult to insert it through the ICF walls, especially if using a drill. When cutting the pencil rod to length, I typically add at least 12 inches to the outside dimension of the wall that is being braced. This is used to provide 3 inches for the set clamp on one side of the wall and at least 9 inches on the opposite side for the second clamp and the tightener.
The tightener will require at least 5 inches of rod to grasp before twisting the collar, increasing pressure (tension) between the two clamps. When the desired pressure is obtained, the second clamp is tightened and the clamps will hold the forms in place.
The Pencil Rod Clamp
Sometimes when I ask for “cat-head clamps,” I have to add that I’m looking for “1/4-inch pencil rod clamps.” They usually come in a burlap sack of about 50 units per bag. They are made out of cast iron and have a bolt inserted in the clamp to tighten against the pencil rod. The clamp has a 2×3-inch base that presses against the surface of the form to apply pressure to the two outside surfaces.
Whenever I use these clamps with ICF I add a piece of wood between the clamp and the face of the ICF to increase the surface area the clamp’s pressure is applied to. Because the walls of the ICFs are styrofoam, I have had the pressure of the clamp pull through or damage the wall when I use the clamp by itself.


The Pencil Rod Tightener
The pencil rod tightener is a device that can clamp onto the 1/4-inch rod by using a barbed lever on one end. On the other end is a threaded twist handle which will butt up to the pencil rod clamp. By twisting the handle on the pencil rod tightener, pressure can be applied to the set of clamps. It is used on one side of the two clamps to tighten or add tension in between the two clamps.
First, one side needs to be installed and the clamp tightened with very little pencil rod extending through. Next, the second clamp assembly (wood plate and pencil rod clamp) needs to be installed on the opposite side. One side of the two clamps would be set and tightened beforehand. The opposite side is pulled by the tightener, creating tension between the two pencil rod clamps. When the desired pressure is achieved, the second clamp is set by tightening the set bolt against the 1/4-inch rod. The tightener handle can now be removed. This process provides a quick and easy way to reinforce ICF wall sections in various ways that can not be accomplished as easily or reliably using other methods.


Method 1: Pre Placement
Pre placement means the rods are installed as needed during the stacking of each course of ICF forms. I typically review the plans to determine if and where pencil rods bracing would be needed or be the best method for reinforcing different ICF wall requirements. I will then pre cut and place pencil rods at each location to be installed with each ICF course.

Method 2: Post Placement
Post placement means installing the rod after the block has been installed. Using a 1/4-inch cordless drill, insert one end of the rod into the drill and leave the sharp diagonally cut end out to act as a drill bit. Insert the rod into the ICF block and drive it through using the drill. Be careful to position the rod so that it can use the internal connecting webs of the ICF block to support the rod on longer distances. Drive it through until it passes through and extends out on the opposite side.


The 1/4-inch rod is measured so that it can be cut approximately 12 inches longer than the length required to be clamped. When cutting the rod, I usually cut it on a sharp angle to create a chiseled point. This will help when trying to thread or insert the rod through an ICF wall section that needs to be reinforced. Use a cordless drill with a 1/4-inch chuck to drill the rod through both sides. If there is wood on one side, pre drill the wood and pass through the hole. By cutting the end sharply, it can be used as a drill point to bore through wood in some cases. Care must be taken when trying to bore through wood members with distances greater than 48 inches. If too much pressure is applied to the rod at one time, the rod can coil up inside of the block. This is one of the main reasons that straight rod is preferred. Bent rod will wobble when used as a drill bit in a cordless drill.
Accessories
There are other tools that I have found to be very useful with the pencil rod system.
- A drill bit — I prefer using 1/2-inch, with a 1/4-inch speed drive attachment end.
- A 3/8-inch socket adapter with a 1/4-inch speed drive attachment end.
- A 13mm 12-point socket.

All these are for use with a 1/4-inch cordless impact driver. You can use a hand wrench but it’s much slower than if you are using the cordless impact driver. When using the impact driver, care must be taken not to overtighten the bolt on the pencil rod clamp. Overtightening the clamp causes the bolt to bend the rod inside of the clamp, forming a divot, which can make removing the clamp difficult later on.
Another condition to be avoided is under tightening, or not applying enough pressure to actually secure the clamp when pressure is applied. This can lead to form failure due to the support the clamps were intended to provide being removed.
After installing the pencil rod clamps, care should be taken to remove any hazard created by the rod protruding out from the rod clamps, especially if they have sharp ends. An easy method is to cut the ends off flush with the clamps using a cordless grinder with a metal cutoff blade. Another method is bending the protruding rod ends down close to the wall to avoid someone being injured by the extended ends. Finally, I have drilled 1/4-inch holes into the ends of small blocks of wood and inserted the wood blocks over the exposed ends.

Dan McCullough is currently a partner in TEK Building Materials, a Logix dealer serving southern Wyoming and Utah. Previously, he started and ran a Logix dealership throughout Utah. During that time, he built many award-winning and innovative residential and commercial projects. He has 10 ICF Builder Awards for projects he built. He also has several magazine articles that have been published about previous ICF projects. In addition, Dan has also been the recipient of 12 Logix Builder Awards. He was one of the first dealers/contractors to use ICFs in the construction of swimming pools. Dan designed an embedded Joist Hanger to improve the way floors are connected to ICF walls. He served on the board of the ICFA (Insulated Concrete Forms Association) for three years. He has created several ICF training and instructional programs and is a continuing education instructor. Reach him at dan@icfutah.com.