Every house or building design requires numerous rough openings for doors and windows. Incorporating these openings into an ICF wall assembly requires a number of fundamentals to be established in the pre-design. Don’t try to layout the block coursing to suit the opening locations. Instead, build and cut all the openings exactly where you want them. Building a hole in a concrete wall requires a lot of consideration with exact information. It is very hard to fix any mistakes for an opening regarding size or location in concrete. Pre-planning and double-checking on paper ensures an easy build.
First — Select the window manufacturer and document the width and height of each window. Note that changing a window supplier during construction may alter the sizes. Always confirm the window and door rough opening (RO) sizes before installing the openings in the ICF wall and/or placing concrete. If you happen to change window manufacturers, always confirm any dimensional changes, especially on the RO.
Second — Understand what the rough opening (RO) means. As an example, the design calls for a selected window size, nominally 48 inches by 60 inches, but that is not the actual installation size. The installation size is the RO size, which means the actual frame size is about 1/2-inch less (47 1/2 x 59 1/2 inches) to allow for a 1/4-inch gap on all sides around the window once installed. The RO size is the important size for the opening in the wall for that 48 x 60-inch window. Making the RO size too big creates a larger gap around the window which needs to be insulated. A smaller RO means the window will not fit in the opening. The 1/4-inch gap between the buck and the window, on all sides, is the recommended size to allow for shims and to seal the opening. Check with your selected window manufacturer to confirm these sizes and document on the building plans the actual RO size for each window and door.
Third — Select the type of mount for the window. Most residential windows are a flange mount, meaning it is fastened to the unfinished exterior face of the wall by a flange that surrounds the window. The other is an insert-type mount, meaning the window fits in the wall opening and is fastened through the side of the frame into the wall opening. Each mounting type requires different flashing and finishing detailing, but the RO gap around the window would still be the same.
Fourth — Decide on the window buck system. The window buck is typically a permanent frame around the opening that retains the concrete on all sides, providing fastening points to attach the window. There are various methods for installing window bucks and it is important to select one to define how to cut the ICF opening and install the buck system to achieve the correct RO. The buck system has to be designed to achieve a number of functions — strength to retain concrete, not bow or warp during concrete placement, provide solid attachment points for the window, be moisture resistant and be durable. Failure to meet any of these functions will lead to problems, either immediately or in the future.
Wood bucks — Wood bucks are made of 2x lumber, cut to fit the exact width of the ICF wall assembly. It is recommended that any wood in contact with concrete be pressure treated or protected from the moisture within the concrete. Another method is to use 1/2-inch or 3/4-inch plywood on a 2×4 frame. The wood buck does provide a thermal bridge around the opening, and as the concrete sets, there will be a slight air gap between the concrete and the wood over time, allowing for the possibility of air and moisture infiltration later on. Wood bucks must also have embedments into the concrete.
Vinyl or Composite bucks — There are manufacturers that make extruded vinyl bucks that may be assembled on-site to the correct size to fit. The vinyl buck is a flange mount-type fitting around the ICF block, and the window would be fastened to this flange. Vinyl bucks minimize thermal bridging and air penetration around the opening.
EPS bucks – EPS bucks are available from some ICF manufacturers. These fit over the wall cavity and have a fastening strip to attach the window. The EPS buck eliminates any thermal bridging or air penetration around the opening. EPS bucks are very easy to install and provide the best thermal efficiency.
More Tips
Evaluate material costs and labor before selecting a buck system. Making your own wood bucks may be appealing, but consider the full labor aspect. Once the buck system has been selected you need to note the width of the buck. The EPS Fox Buck is 2 inches thick and a wood 2×12 is 1 1/2 or 1 3/8 inches wide. If using plywood, use 1/2 inch or 3/4 inch as a minimum and support to eliminate any bulging during concrete placement. Take the RO of the window and add the buck width for both sides. This will give you the exact width and height of the wall opening (WO) in the ICF. When placing block, use the WO for the opening. For efficiency, pre-build wood bucks and have them ready to install as the walls are stacked.
All bucks must be physically connected into the concrete. Wood bucks may have countersunk anchor bolts or long structural screws cast into the concrete. Vinyl and EPS bucks are designed with attachments built-in.
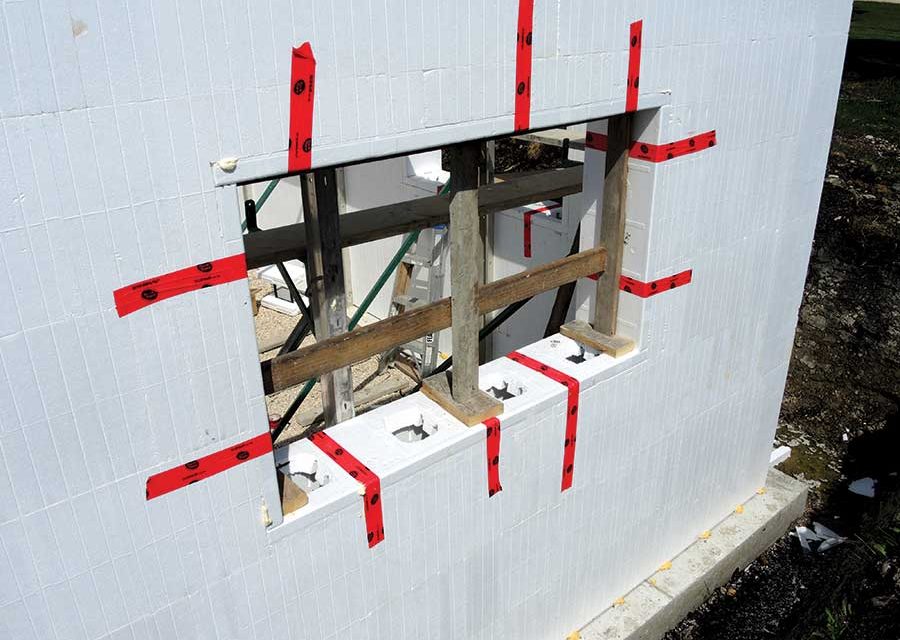
When installing all buck systems, the design is to allow for the concrete to be placed through the sill and access for consolidation. For a wood buck, the sill is typically two 2x4s spaced apart. For an EPS buck, large holes are cut into the sill buck. All buck systems require temporary support or bracing horizontally and vertically against the sides and the header prior to concrete placement. The larger the opening, the more temporary support is required.
On the building plans, have the RO and the WO size plus the centerline of the openings indicated on each wall. As you lay out the first two courses of ICF, mark on the block the centerline of the opening and write the RO and WO sizes. As the block is stacked, rough cut the block to overlap the opening, then once the wall is complete, cut the opening WO exactly to suit. If you plan to use pre-built wood bucks, cut the opening and insert the pre-assembled bucks as you stack the walls. The other key information for openings is the sill height — typically all openings will have the same top-of-frame height, leaving the same lintel depth over all openings.
Every opening does require additional rebar around the opening as well as the lintel over the top having top and bottom bars held in place by stir-ups. Lintels over openings are designed to support and distribute the load over the opening. The criteria for lintel design are dependent on the load plus opening width, width and depth of concrete in the lintel, and the solid wall width on either side of the opening. Follow the engineering design for lintels on all openings.

Pictured is an example of a lintel design for a window opening.
There are restrictions and construction issues with some designs having multiple windows or openings in walls and/or near corners. Structural shearwall requirements in the building codes require specific “solid wall length” for certain walls and require special engineering for openings at corners. Make sure your designer or engineer is aware of these design requirements. The other issue is having multiple openings too close together. As a construction issue, having 4 inches or less of vertical concrete between openings is not practical and is difficult to build. This minimum width of concrete provides no structural support and is very hard to place in this small vertical space. As an alternative design, make the window grouping as one larger opening designing a larger span lintel and fill between the windows with non-load bearing material.
Once the bucks are in place, secure them with temporary perimeter strapping or tape and install the temporary bracing. Perimeter strapping, on both sides of the wall, is required if cut blocks have more than 4 inches of the EPS unsupported by a web. These areas are subject to blow-outs during concrete placement. Ensure the sill is open to place concrete. Prior to concrete placement, re-check the opening locations and that the correct buck RO size has been installed.
During concrete placement, ensure the concrete fills around the opening and consolidates especially at the corners of the opening and the lintel to ensure the rebar is surrounded with concrete. Remove the temporary bracings after two to three days. It is recommended to not apply point loads on lintels over larger openings for at least seven days.
When the windows are installed, use screws to attach the window flange to the buck. There will be this 1/4-inch gap around all sides, which, from the interior, will be filled with low expansion spray foam to seal and make this cavity airtight. The spray foam also helps to secure the window in place. The next step is the exterior flashing (which is another How To article!).

Tom Patton
Tom Patton had a 30-year architectural design background prior to joining the ICF industry in 2001 with the technical support department at ARXX. Over the last 20 years, Tom has worked with major ICF companies developing technical documentation, application details, and training programs, as well as consulting and promoting ICFs with various associations including the ICFMA, NRMCA, and codes and standards committees. Currently, Tom is Corporate Brand Ambassador for Fox Blocks and co-developer of the Fox Blocks Integrated Learning Center.

